Fedora on PineTab2
When I bought a PineTab2, I knew there was some amount of hacking in front of me before I would be able to run my OS of choice on it. It was a journey of learning and persistence 🙂 but eventually I managed to boot Fedora on it and it seems usable. (Note: Kernel hackers are still working on WiFi drivers so for now it’s recommended to use a USB-C dock with a WiFi dongle when one needs networking.)
If you want to run Fedora on the PineTab2 as well, and you are fine with a bit of kernel and image building, this post is for you. The post might be useful even in case you’re looking to run a different distro that doesn’t have ready-to-boot disk images for the PineTab2.
Overview
I should say there is already a Fedora PineTab2 image on the FTP server that the Fedora Mobility SIG uses for nightly images, but I didn’t want to use that one because:
-
It’s running KDE and I’d like Gnome (or go wild and try Sway with some touch-friendly config, but let’s start down to earth).
-
The build process for the image wasn’t documented/scripted, but I wanted to learn how an image for the PineTab2 can be built.
So I set out to build what I needed from scratch, with a few initial pointers from the Fedora Mobility community chat. (Thanks, Yoda!)
Steps I’ve done to boot Fedora on the PineTab2:
-
Flash rk2aw into SPI flash memory to stop worrying about boot order and possible soft-bricking.
-
Build a Linux kernel with a few necessary extra patches.
-
Amend the Fedora aarch64 image to use the built kernel.
-
Write the resulting image onto an SD card and boot from it.
On a high level, that’s all. Let’s dive into each of those steps individually, as the devil is always in the details.
PineTab2 boot order and rk2aw
First, let’s address the boot procedure of PineTab2. This section is not Fedora-specific, and it is not strictly required in order to boot an OS from an SD card, but most likely you’ll want to know about and solve PineTab2’s soft-brick pitfalls before starting to tinker with it.
PineTab2 looks for a bootloader on devices is this order: SPI flash, then eMMC, then an SD card. It ships with an empty SPI flash and with U-Boot and DanctNIX Arch Linux on the eMMC. The U-Boot on eMMC actually prefers booting from SD card partitions if bootable content is detected there. This way it is possible to boot an operating system (but not a bootloader) from an SD card out of the box. However, for tinkering with any device, it is preferable if the highest priority storage device when looking for a bootloader is something removable, as it can be re-flashed externally in case of trouble. This is not the case with the PineTab2. Should the U-Boot on eMMC become damaged or misconfigured but not properly removed, and the tablet would still try using the eMMC bootloader but fail to boot, then it would not be possible to work around it just by inserting an SD card with a good bootloader, the tablet becoming effectively bricked. Fortunately the PineTab2 ships with a USB-C dongle that allows skipping the SPI and eMMC during boot, making the tablet boot from an SD card, allowing to work around brickage scenarios.
In my opinion, a nicer solution to the same problem under the majority of circumstances is flashing something smart into the SPI and not touching it afterwards. Since SPI is only for booting and it doesn’t need to be altered when installing an OS into eMMC, there is no reason to write into the SPI flash routinely, so it has very low likelihood of being misconfigured by accidental writes.
One smart thing that can be loaded into the SPI flash is “rk2aw”, a loader of bootloaders written by Ondřej “Megi” Jirman, a stalwart of the community around Pine64 devices. In a nutshell, rk2aw gets flashed into the SPI along with two bootloaders (for fallback), and it also flips the order of storage devices when looking for a bootloader, making it: SD card first, then eMMC, and last the bootloader(s) in SPI that got flashed alongside rk2aw. When booting, the tablet always loads rk2aw, which then looks for bootloaders in the tinkerer-friendly order. Rk2aw also allows overriding which bootloader gets selected. It does so via a simple interface utilizing LED blinking and long/short presses of the power button during boot time. This solves the boot order woes nicely, but you may still want to keep the USB-C dongle for the unlikely scenario that rk2aw in SPI becomes somehow damaged.
I would recommend learning more about rk2aw before flashing it. See the rk2aw home page, which also contains installation info.
One more heads up. If your PineTab2 shipped with an old enough DanctNIX Arch Linux build and you wish to use this distro to flash rk2aw, you will have to overcome additional issues:
-
The initial kernel doesn’t contain drivers for the SPI, so the rk2aw flashing tool will not work. You will first need to connect the tablet to the internet, upgrade the DanctNIX packages and reboot. With a newer kernel the SPI flash is recognized.
-
The domain of the DanctNIX repository URLs has changed, so you may have to edit the pacman config file to be able to get package updates. See a toot with details.
Linux kernel cross-compilation for the PineTab2
A full cookbook of kernel compilation is out of scope of this post. If you aren’t familiar with these things at all, it would be good to skim through How to quickly build a trimmed Linux kernel or another guide on kernel cloning and compilation, and the kernel make targets help.
To cross-compile a kernel for the PineTab2, we’ll need:
-
Cross-compilation dependencies. I’d run:
dnf -y install dnf-plugin-builddep dnf -y builddep kernel dnf -y install gcc-aarch64-linux-gnu -
A kernel config file. I took the config from
/proc/config.gzof the stock DanctNIX Arch distro and swtiched Btrfs support to built-in, arriving to this config. It is necessary to have Btrfs support compiled into the kernel rather than as a module, because Fedora uses Btrfs for the root filesystem. -
As of November 2023, a few out-of-tree patches. I built the 6.6.2 kernel with a set of patches used by DanctNIX. The patches in DanctNIX on top of the stable 6.6.2 kernel are:
ZEN: Add sysctl and CONFIG to disallow unprivileged CLONE_NEWUSER
drm/panel: Add BOE TH101MB31IG002-28A MIPI-DSI LCD panel
arm64: dts: rockchip: Add Pine64 PineTab2 device trees
power: supply: rk817: Fix battery capacity sanity check calculation
With the necessary patches in the working tree and the config in
.config, we can cross-compile the kernel for aarch64:
make ARCH=arm64 CROSS_COMPILE=aarch64-linux-gnu- all
And generate the tar-install directory to put all compiled kernel
modules into one place:
make ARCH=arm64 CROSS_COMPILE=aarch64-linux-gnu- dir-pkg
This should give us the kernel at arch/arm64/boot/Image, and
compiled device trees and modules under the tar-install directory.
We’ll need these in the next step.
Fedora aarch64 image for the PineTab2
We’ll need to download a Fedora aarch64 raw.xz image. I worked with Fedora release 39 Gnome desktop image, the latest release at the time of writing. (By the way, using a KDE image as the base worked too, but I tried it only once.)
Amending the downloaded image file to make it bootable on the PineTab2 is not very difficult but it’s also more than a few commands to run, so I went with a Makefile approach.
First, we clone
the repo containing the Makefile.
The Makefile calls losetup, mounts the image’s filesystems and
writes files into them, some of them owned by the root user. This
means the Makefile makes use of sudo. I recommend reading through
the Makefile and understanding it before continuing.
We export a few variables that will point the Makefile to the downloaded disk image and the built kernel:
export SRC_DISK_IMAGE=~/downloads/Fedora-Workstation-39-1.5.aarch64.raw.xz

export SRC_KERNEL_IMAGE=~/linux/arch/arm64/boot/Image
export SRC_KERNEL_RELEASE=$(cat ~/linux/include/config/kernel.release)
export SRC_KERNEL_DTBS=~/linux/tar-install/boot/dtbs/$SRC_KERNEL_RELEASE
export SRC_KERNEL_MODULES=~/linux/tar-install/lib/modules/$SRC_KERNEL_RELEASE
And we run:
make all-pinetab2
If everything goes well, an out/image.raw file will be generated. In
addition to installing the selected kernel, the procedure also creates
/boot/extlinux/extlinux.conf file and a service that will create the
pine user on first boot.
Booting
We write the out/image.raw onto an SD card, boot the PineTab2 from
it and a familiar GDM login screen should greet us. As is the
convention in the Fedora Mobility images for Pine64 devices, the
default login credentials are username pine, password 1111.
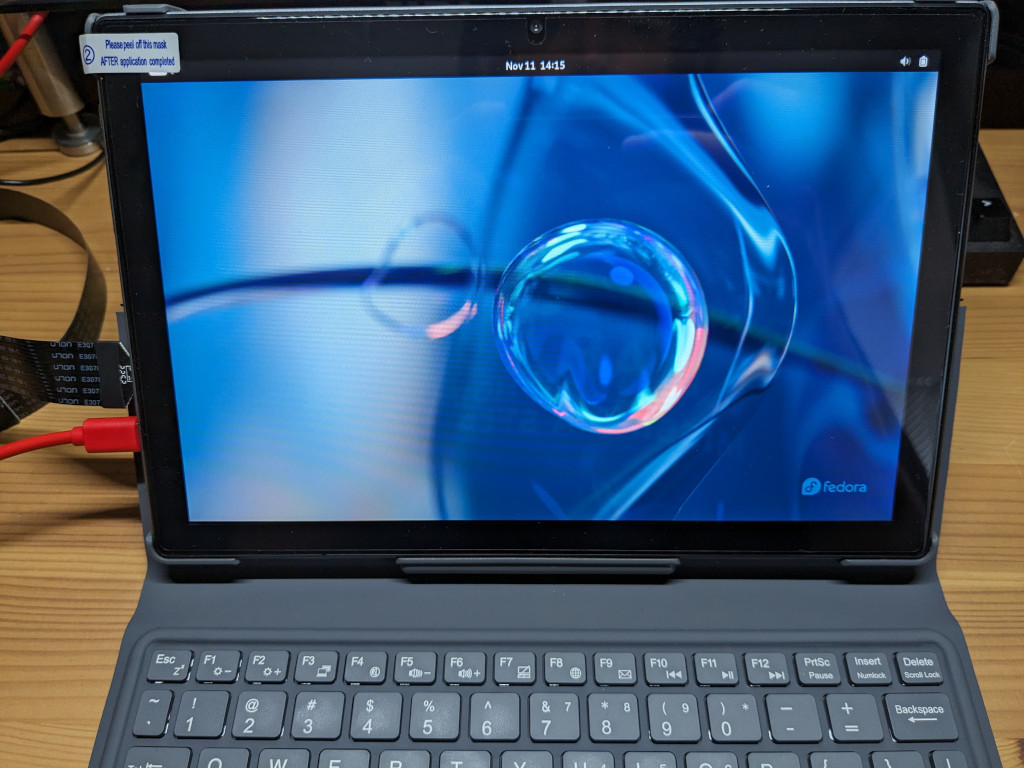
So there we have it, PineTab2 running Fedora Gnome from an SD card. There are additional things one might wish to do before considering the PineTab2 setup done and ready for use:
-
Copy the partitions onto the eMMC and boot from there, as it will be faster than using an SD card. (This requires changing the root partition reference in
extlinux.confand might also include wiping the stock eMMC U-Boot to start using the one flashed with rk2aw into the SPI.) -
Just like iOS and Android devices use encryption of user storage to prevent data theft on device loss, any Linux tablet or phone should encrypt at least
/homeand/var.
I may address these in a different blog post or leave them as an excercise to the reader.
Happy hacking!